Space and Shelving
At all of the schools and institutions I've been at, space has been hard to come by. Luckily, my department was kind enough to let me have the space outside of my office for books and generous enough to purchase some bookshelves for the books.
 |
| A somewhat tilted view of some of my bookshelves. |
My main takeaway is that it is better to overestimate the number of shelves you will need. Even if the library looks sparse for a while, this is better than running out of space four months after getting the shelves.
Another lesson I've learned is that there is a reason library shelves aren't stuffed with books. Instead, there is some breathing room so that books can be added as needed. Right now, the shelves are packed with books, which means that I have to move quite a few books around to fit in new texts as I get them.
Finding Books for Your Library
For most teachers, funding for the most basic supplies (pencils, pens, paper, etc.) is limited, and getting money for books can seem impossible. However, there are numerous sources for cheap (and even free) books. My earlier post, "Tips for Building Your Classroom/Office Library," has a number of ideas of where you can get started.
Most of my books came from a combination of places. A number of them came from several NCTE conferences and ALAN Workshops. I also tend to visit the book sales that my local library holds on a monthly basis. While the books are usually library discards, they are often in good condition (they are taken out of circulation because there are excess copies, not because there is anything wrong with them). Additionally, there are sometimes some great finds at these sales.
The rest of the collection has been filled out by visits to Better World Books, Barnes and Noble, and a variety of used book stores. While it may not be as easy as just ordering a bunch of books from Amazon, there is something very satisfying about bargain hunting for good books.
Cataloging and Circulation
By far, the most time-consuming part of the project was cataloging the books. Using LibraryThing and a CueCat barcode scanner, I entered and tagged the books. I also cataloged the books using Classroom Organizer. This step made sense at the time because I needed a way to keep up with books that were checked out. However, since I started cataloging books, LibraryThing introduced a lending/circulation feature for regular members. Consequently, I was able to stop entering books into Classroom Organizer, which saved time and frustration.
The caveat is that, unlike Classroom Organizer, LibraryThing does not have an app that checks books in and out. However, I found the Classroom Organizer interface to be frustrating to use, especially for books that refused to scan. Additionally, it isn't as customizable or inviting as LibraryThing. As a result, I was more than willing to trade iPhone compatibility for a better interface and a more streamlined experience.
Currently, I have students check a book out by writing down information (name, phone number, and the books checked out) in a notebook. I then check the notebook and mark the appropriate books in LibraryThing. While this is somewhat clunky, I find that it is better than training all of the students on LibraryThing (and keeping my personal LibraryThing account open and available on an office computer). We'll see what happens in the fall, when the library will hopefully get more use.
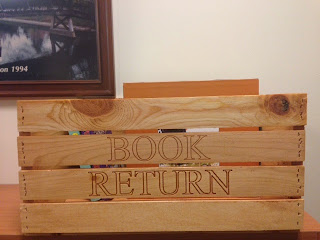
To return books, students write the date that a book is returned in the notebook and place the book in the book return box.
 |
| The front of what has to be the cutest book return box ever |
 |
| The side view of my book return box |
Thanks for taking the time to read this post! Setting up this library has been a great experience, and I'm excited to get a chance to share it with others. If you have comments or questions (or if you have your own library pictures that you want to share), please feel free to leave them in the section below.
No comments:
Post a Comment